Tuesday, January 29, 2008

Photographing & Photoshopping Statues

I LOVE photographing statues. They don't move. They don't care about the weather. They just sit/stand/lie there and provide TONS of options for a photographer who is open to looking at them in a new light.


An artist has taken his/her time to create a complete sculpture. Capturing the whole statue is impossible. So you need to look at a statue -- or parts of the statue that effect you.

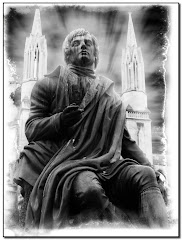
This is a statue in Vancouver. It's out front of a brick building. When I first saw it, I had to catch my breath. There was something about the tender way the angel is holding the fallen soldier -- and his complete helplessness. The image was powerful to me -- and so I wanted the image I created to be as powerful.


Obviously the brick background had to go. Then I went to work on the background. First I built a planet in the upper right hand corner using Lunar Cell from Flaming Pear. I added some upward motion inside Photoshop. And I wanted to add light, which I splashed across the front using Knoll's Light Factory. I'd cropped the picture so that the heads are in the dynamic points and that there's a smooth line of sight from her face, to his to the light.


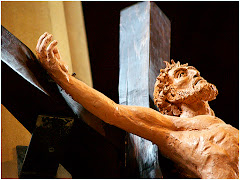
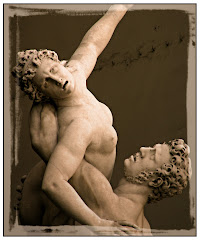
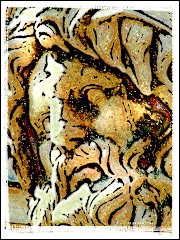
Without a little abstract thinking, statue photos can be really dry and borning. Take a hard look at PARTS of the statue that make your point. Case in point: a very impressive statue of a warrior in the Vatican. You'll NEVER catch the spirit breathed into the creation by the artist. But you CAN focus on one part of the statue that communicates an idea to your audience.


You don't need to see the rest of the statue to know what it's about, right? You can see the strength in the hand and you can see that the worn sword has been used. I like this picture better than the image of the whole statue...when you take a bite sized portion, it makes for an image meant to be contemplated. Think of it as an appetizer and not the steak.

I've posted some other statue pics to the right. I try to use light...and Photoshop...to create a stronger image.

Here are THREE GREAT TIPS for photographing statues:

1) TAKE TIME TO STUDY THE STATUE. Look at it from many angles. Take long looks at portions of the statue...the hands...the head...the things they may be holding. If you take a few minutes to study it will pay off.

2) HOW DOES THE STATUE MAKE YOU FEEL? I felt something very significant looking at the angel/soldier statue. The feeling it gives you allows you to compose your artwork more precisely. Use light...background (context)...and Photoshop to make your point clearly.

3) TRY TO SEE THE STATUE MORE THAN ONCE. Try it in the afternoon...early evening...dawn. You'll see different light. You'll notice things about it you never saw before. Don't be afraid to get down on the ground and look up. Different angles and different times of day are critical to making a great image.

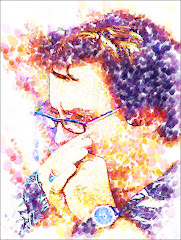
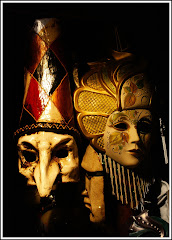
Finally remember that the term "statue" can be anything: a window display, a mannequin...any visual that doesn't move.

Monday, January 28, 2008

Travel Portraits

What's the deal with portraits...and why are so many of them boring?

Most of us have seen those corporate portraits: the confident man sitting with a half smile on his face and a "your money will be in good hands with ME" look in his face.

That's not a portait. It's a sales tool -- and it's very successful on that level. It's a picture designed to inspire confidence in a person.

In short...it's a portait with a PURPOSE. All portraits should have a purpose...a reason to exist. A portait is an artistic impression of what someone (or something) is all about. It's a subjective image where the image-maker says "Here's something I wanted to share with you about a person I met."

Travel portraits, in particular, are tough to do. Your subject isn't in a controlled studio setting and they aren't going to pose for you. You have the time it takes for the shutter to click to complete your basic graphic. It's a split second impression that you, as the artist, have designed to make a point.

It's not a picture of Aunt Sadie smiling into the camera...or Uncle Joe making a show of sticking his finger up his nose. What interesting information do those pictures tell a stranger about Aunt Sadie or Uncle Joe?

We were in New Zealand, my wife and I. And we took a full day to visit Lord of the Rings film sites. The fellow leading the tour is pictured to the right. He was a performer in the film -- and is passionate about his subject matter.

We were impressed with how much he knew about the films, where they were shot and what was going on behind the scene. He'd put a lot of time into planning what to share and how to share it.

Taking a picture of him in a studio setting with his hands folded neatly on his lap would tell you nothing about him, right?

Try to get your travel subjects inside their CONTEXT. By "context" I mean "in a place that says something significant about them" or "as they do something significant."

In this picture, he was reading a passage from Tolkien's book to an enraptured audience. You see intensity on his face -- the focus for my portrait. The page with the passage on the back of it is visible -- but isn't in focus since it's not the main idea of the picture. He is. His passion is. He's a guy in context.

Photoshop makes it easy. I sharpened the focus using the "smart sharpen" filter option in Photoshop CS3, did a minor re-crop and threw a "snapshot" like frame on it.

Here's a guy sharing his passion. See his face? See the way he's holding the graphic? See how he cared enough about the graphic to put it in a page protector? See how he's pushed his glasses up -- like they were in the way. Looking at this portrait...how many things could a stranger tell me about who this man is in his heart of hearts?

Try this exercise with one of your travel portraits. Pretend you know nothing about the subject at all. Try to figure out how the visual details you, as the artist, have put into the photo relate information about your subject.

Here are Five Golden Tips for making good Travel Portraits:

1) SHOOT LOTS OF PICTURES. Who cares if 95% of your shots stink? That one that is perfectly framed and beautifully exposed COMPLETES the task. Delete the bad ones and show off the good one. It's digital. Relax.

2) TRY TO INCORPORATE ACTION. Pictures where someone is doing something are much more interesting than ones where they aren't.

3) DON'T GET YOUR SUBJECT TO POSE. These pictures nearly always suck. It's so much better to catch your subject when they aren't smiling into the camera.

4) TRY TO GET AN INTERESTING BACKDROP. Where is the subject standing? Is it an interesting place? Are there interesting colors? It's all part of context.

5) DON'T BE A PHOTOGRAPHER WEENIE. These are the smug types that sneak up on a subject and "steal" a picture. This isn't cool. Try to stick to photographs (the ones with recognizable faces in them anyway) of people doing something in a public setting: street entertainers and the like. And never EVER photograph a child you don't know. This can (and should) get you beaten up in today's society.

The role of Photoshop broadens the idea of HOW to present a portrait.

We happened across some guys playing great music in a farmer's market in NZ. As opposed to simply showing a snapshot of each guy, I used Photoshop and a third party plug in called Virtual Painter to create graphics that would be more interesting to look at. The harmonica guy was real serious and airy. The bass guy was having a great time and the guitar player really looked like he was living a dream to me. So I chose three different applications.

Is there a better way to share your travels than to share an impression of the people you have met in your travels?

There's a chapter on the thoughts that go into travel portratits in the new "Perfect Portraits" book to be released soon at www.photoshopbasics.com

Saturday, January 26, 2008

Using Photoshop For Your Travel Pics

I love travel. And I love photography. I REALLY love Photoshop -- and so one of my greatest pleasures is working with pictures I have taken within Photoshop.

From an artistic perspective, using Photoshop on travel pics isn't just a question of removing red-eye and pumping up the contrast. It's about trying to capture what if FELT like to be standing there...or to take a photograph that shows a fresh "take" on what otherwise would just be a snapshot.

My wife and I are huge Lord of the Rings fans. Actually we were into the series long before the movies came out. So when we went to Australia and New Zealand, one of the highlights of the trip was seeing places where the Lord of the Rings movies were shot.

Even fans of the movies may not recognize the white bridge in the picture. It's just a white bridge. But this particular bridge was the scene of some very significant scenes in the movies.

I took a picture of the bridge -- like everyone else, dutifully standing there snappinc pictures. But how do you show what the site was actually all about? The solution? I scanned and re-worked a picture of one of the LOTR characters and hid it inside the bottom left hand part of the picture. (NOTE: Doing it this way means I am using a picture I didn't take...so it's purely a graphic for my own use. But Cate Blanchette wasn't available for a sitting...)

If you're using Photoshop, the trick to getting the picture right is the DESATURATE the picture so that you get nicely contrasted lines. I then put the picture through Virtual Painter until I got a result I liked -- and then I blended the layers together to get the result I wanted. Finally -- in putting the final graphic together, I lightened the opacity to about 50% and used the often-overlooked "Overlay" Blending option. I finished the graphic with a simple green border.