Thursday, February 28, 2008

Getting Lucky with Celebrities...

Unless you're a celebrity photographer like Annie Lebowitz, getting good pictures of famous people can be really tough. Many genuinely famous people are already not kindly disposed toward photographers they don't know...and with good cause.

Getting that perfect shot is tough. Unlike Annie, who can take time and enlist famous faces in helping her make THE portrait, we have seconds...and it has to be perfect.

Here are a few tips you may want to consider if you are going after a Famous Person To Photograph:

1) Try to catch them in an unguarded moment at a public event. I still remember seeing a picture of Liv Tyler, pushing a stroller through Central Park. She's smiling patiently at the camera and you can feel a little bit of what it must be like to be her. She can't even take her kid to the park without being photographed. I don't consider this to be a "public event."

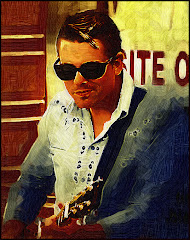
Here's Kevin Bacon. He was being interviewed on an early morning news show. He was there to be seen. I took a number of pictures of him there...and waded through them until I found one I liked. There's an odd expression on his face and each time I look at this picture, I wonder what he was thinking about.

It's what I mean by "unguarded." He doesn't have a "footloose" smile on for the camera, but there's something going on in his mind.
I like this pic a lot. In many compelling portrait shots the subject ISN'T looking at the camera. When you get that second in real life, it can make for a very strong image.

A minute later, he put his sunglasses on and headed out.

Of course you need to shoot and keep shooting. You will need to wade through a LOT of photos to get the one that really works. Think of it as "Forcing the Fluke Great Shot."

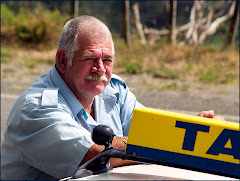
2) Try to get your subject doing something they really like. Living in Edmonton has it's advantages. The Edmonton Grand Prix is one of them. Why? Because Hollywood icon Paul Newman likes the champ cars -- and is in partnership with McDonald's on one of the teams.


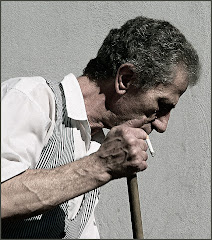
I waited all day in the hot sun for an opportunity to get a good photograph. Most of them were of the back of his head...his hand reaching for water. But my patience was rewarded when his driver won the race -- and he came out of his command center with a genuine smile on his face. It's a real emotion on a famous face.

You can kinda see Cool Hand Luke peering back at you. Or maybe Butch Cassidy...or........?
My point is that in that second, as Newman made his way toward to little red scooter he uses to get around on at Grand Prix events, the guy was genuinely happy. And that is what makes the picture work for me. Leathery skin, oversize sunglasses and all.


3) Make sure your lens is clean, that you have batteries charged and that you have chosen your spot with great care. I think it is SORT of like a hunt. Like any hunter, you need to be completely ready for that one second. And in that one second your equipment, your concentration and your angle have to be perfect. Just think of how you'd feel if you raised the camera to your eye and saw you have a dead battery -- or your thumbprint on the lens.


4) Canadians are polite...mostly. When photographing celebrities, act like a Canadian. Think about it: how would YOU feel if someone you didn't know started taking pictures of you or your kids? Celebrities are the same way...only their sensitivity is heightened. They have no idea what you plan to do with the pictures. If they ask you to stop...stop.


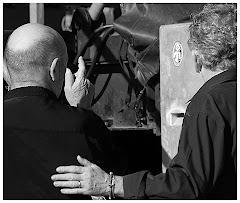
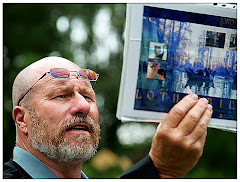
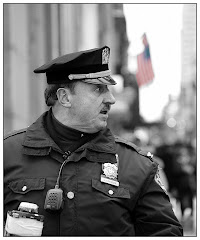
5) Don't be afraid to try a fresh angle. Harry Smith goes into millions of homes each morning. Since much of his show is taped outside it's easy to get pictures of him looking exactly like you'd expect him to. I had time to think about how this shot needed to be composed. I wanted him looking off-frame with the "context" (a fancy way of saying "the place where he is doing what he does") behind him. I lined myself up and waited. I think this photo is more interesting than the standard "index finger on the chin" shot most other people were taking.

The camera off to the left of the frame -- as well as the people in the background are all out of focus. Only the subject is sharply defined and he looks intent on something. It's a use of negative space to create a context...and to make a statement about the subject.
Celebrity pictures can be wonderful. I enjoy looking at them because if the picture is taken properly, you can look at a well known face and see them in a REAL moment. And in that flash of a second you need to press hard on the shutter button and hope your planning and work will pay off.

Wednesday, February 27, 2008

Seeing The Picture Through All That VACATION!

Travel is the great passion of our lives, my wife and me. We are determined to see as much of the world as possible before we get old(er) and unable to travel. I've often wondered what it is about travel that makes my heart sing.

What is it about those precious few days before you leave on vacation? Why does my heart beat faster? Why does music sound better? Why does food taste wonderful?

I am pretty sure that we are born to go out into that great big world and "take a look." Photographers have an added mission -- to communicate their vision to people they may never meet.

Taking the picture is about trying to SHOW how it FELT to stand at the foot of an ancient Aztec temple...or what you may have thought as you looked at a person sleeping outside Central Park in NYC with all their worldly possessions loaded into a shopping cart. I took the pic on the left on the last day of our last trip to NYC and I really felt moved by the image of this woman sleeping in the midst of all that activity. It didn't seem right to photograph her face...the posture of her body was enough.

The picture simply didn't work in color. It seemed far too ugly. This picture needed to be grainy and uncompromising. This is, after all a very definate "up yours" from street people, isn't there?

You need to stand and THINK about a photo before you take it. Think about how you plan to compose it. Think about how the visual you are creating will show how you felt as you stood there. We wound up at a Renaissance Fair one enchanted summer afternoon. Having never been to one of these before, I was simply blown away by the color and the passion of the people there. Some were in costume. Some weren't.

This precious woman WAS. And I loved the idea that after all these years she could still dream. And she could still dress up and put flowers in her hair. I wanted a picture that showed her doing something...and a picture that would allow us to look into her heart...just a little.

When we're on vacation, there's a tendancy to concentrate on where you are going, on the next meal or drink...to fail to be THERE in the precise place you've travelled to get to.

When you travel, consider taking your camera everywhere. Always try to see the picture. And after you've SEEN it, try to think how you will communicate that to other people.

They (whoever "they" really are) are planning to shut down Coney Island soon. How sad. This place is an icon. But it continues an existance in New York's progressively tough neighbourhood anyway. There are rides and food stands. There is a massive boardwalk and a beach and, of course Nathan's which is the birthplace of the hot dog.
I took a ton of pictures on the day we went there. This is my favorite. I looked at these people for a while before deciding how I would take the picture. I wondered if they had maybe met at Coney Island or courted there. I wondered who they were...and smiled when I saw the tender way the man had his arm draped over the shoulder of his bride. They were sitting together enjoying the day in the manner that suggests that they have enjoyed many days together.
I chose to put my subject a little off center, because I suspect that they have fallen a little out of step with the society that surrounds them. And they don't seem to care...which is the coolest thing of all.
Travelling is an experience. It is the task of the artist to try to communicate that sense of wonder to their audience. Look always around you. Study the environment. Smell the air, look at the people. THINK. THINK about how you will convey this in a visual image.

Thursday, February 21, 2008

To Lightroom or Not to Lightroom...???

"That is the question....whether 'tis nobler in the mind to suffer the slings and arrows of outrageous workflow -- or to take up arms against a sea of software headaches and by opposing...end them."

Okay. With all due apologies to Mr. Shakespheare here's the question a lot of new and old Photoshoppers are asking: "Just what IS Lightroom...and why should I care?"
Even after having worked with it for a year, I have to say I am not entirely sure. This is the ONE thing I KNOW for sure.
LR is designed to be the FIRST step in your workflow. You return from shooting the California Artichoke Competition. You take the 4,325 pics you've just taken and import them into Lightroom. This is very simple. In Lightroom, you choose Files> Import > and choose the source. Up pop the pics for importing. Here's where you can add the Keyword information.
The screen to the left will pop up once LR has sorted through the Import options and ensured you aren't importing the same picture twice.


The Keyword area is circled in green. This is where you attach information that will help you find your photo again. This is a finished and photoshopped pic I took on a trip to Australia and New Zealand. I'll be able to find it again by inputting the key words: Hotel or Australia Finished, or Balcony or traveller. As you fill in the information in the Keyword area be as thorough as you can. This will save on the pulling at your hair phase when you are looking for a specific graphic amid thousands of pictures.


The second phase of LR is accessed through the menu in the upper right hand corner of the screen: DEVELOP. This was intially designed as a pre-Photoshop area. The idea was that you would do all the prep work here: the cropping, the sharpening, minor corrections etc. using what is really a very extensive menu.
It's become quite a bit more than a minor pre-Photoshop area since you can do a TON of stuff here with no fuss and hardly any trouble.
It is from here that I will most often go to Photoshop for final processing. There's an option accessed through Photo> Edit in (your version of Photoshop) which minimizes LR and opens up Photoshop.
There are many very very cool options in LR. That's why people write books about it. You can create slideshows, publish your work to the web, access a ton of print options and much more. My absolute FAVORITE thing about LR is the crop tool (see the "Most Useful Piece of Photography Advice" posting below.) but there are many other wonderful things you may want to check out.
The first edition of LR was fraught with problems. People spent weekends inputting information and importing photos only to find that a software glitch wiped it all out. There was talk of crashing computers and strident cries for the immediate and painful execution of each person ever associated with LR as well as their immediate families...and pets.
Adobe has now released the second version of LR and many of the clunky things have been wiped out and what remains is a pretty servicable -- if kinda pricey -- package that WILL one day be a part of most graphic pro and amateur workflow options.
Take it out for a free 30 day test drive at http://www.adobe.com/
I'd be interested as to what you think of LR.

Monday, February 11, 2008

Why Use Black and White?

Flashback: It's the late 1970's. I am in college, in a darkroom, busy as I prep a project in my photojournalism class. I remember the smell of the chemicals, the tempermental enlargers...and the sensation.

The sensation is that prickling feeling on your neck as you watch a really good picture slowly appear on photography paper. It's a portrait of a friend of mine. I see highlights in her hair -- a perfect catchlight in her eyes and that gentle grey light playing across her face. It's a great picture. I sigh with satisfaction and pride.

Our photography instructor, an ancient man who smells of tobacco and spits when he talks, comes up behind me. I step aside so he can admire my photographic harvest. He peers at the picture, which is now in the stop bath. He looks at me. He looks back at the picture.

"Got lucky, huh, Thiel?" he growls finally.

Yup. I did. But still -- it's a great picture. It's really good. I have a clear mental image of it still, even though the pic and the friend have slid far out of my life.

There remains something nearly mystical about a well done b&w photo. There's a singularity of vision -- a simplicity that can make your point with dynamic power.

And you no longer need a darkroom to do it. If you own Photoshop CS3, it's as simple as going to Image> Adjustments> Black and White. This adjustment is nearly perfect in CS3. If you are working with an earlier version of Photoshop OR Photoshop Elements, try Image> Adjustments> Hue/Saturation.

If you're ancient like me and still remember how the paper you chose to print affected the final visual, you owe it to yourself to check out http://www.alienskin.com/. This company has issued a filter set called "Exposure" that will create some utterly amazing black and white conversions.

But let's talk about two things that make Photoshop an ideal vehicle for this process:
  • Your ability to select certain portions of the photograph
  • Your ability to decide what percentage (the opacity) of the effect is done.

At the top of this article is a graphic called "Roxy." It's an old theater I saw somewhere in Montana. The pic was taken on a grey day and needed intensive work to punch up the contrast. I also removed the background and inserted a nasty looking sky. To send the graphic over the top, I added a lightning bolt. Finally I selected the sign ONLY and used Inverse (Select > Inverse) so that I could draw MOST of the color out of the rest of the photo.


It's interesting visually -- because it presents an impossible picture. A tired color set against a black and white backdrop.


Don't confine yourself to simply using Black and White. There are a number of very pleasing effects you can get by working with the Adjustments menu -- and if you want to take Alien Skin's Exposure out for a free 30 day test drive -- you'll find even more things you can do. Blues....greys....even greens can breathe fresh life into a tired picture.


This is a big topic. It occupies a significant section in our upcoming "Perfect Portraits" manual, which will soon be available at http://www.photoshopbasics.com/ . (Hint, hint.)

Sunday, February 10, 2008

The BEST Photograph Advice Anywhere

You can always find the Photoshop "newbie." I'm not talking about those who are just trying to learn how it works. I'm talking about the people who have sat down with the software, given it at least five mintues of intensive study and consider themselves Adobe gurus.

They labor under the illusion that utterly horrid photos can be brought to glistening beauty with Photoshop.

Nope.

A picture that sucks when it's taken will still suck on the Photoshop screen.

Anyone who actually works with Photoshop on a regular basis will tell you that it's waaaaaay easier to take the picture right than correct it later.

That's why I want to take this space to share the AMUPOAIKAGP. ("Absolutely Most Useful Piece Of Advice I Know About Good Photography.")

I share this knowing that veteran photographers are going to be rolling their eyes and whispering "of course" under their breath.

But here goes.

It's called "the Rule of Thirds."

You visualize a tic-tac-toe grid on your photo. The place where the lines intersect are called "dynamic points." (You can try to cleverly work this phrase into as many conversations as possible over the next four days. People will be impressed. Maybe.)
Below is a portrait with some problems. The issue isn't the model. She's doing her job. It's with the photographer. Me.
You may or may not be able to see the grid on the photo. In case you can't, I've added red circles at the places where the four lines intersect. These Dynamic Points are the most dynamic areas of the photo. You really want to put the most important parts of your picture on at least one of the Dynamic points.

Now there's nothing very interesting about her nose, the out of focus background, the camera strap or her jacket.

Take a second look at the photo. What part of the photo needs to be on one of the Dynamic Points? In portraits, eyes are ideal for this purpose. In the corrected photo on the right, one of her eyes is now in the Dynamic Point, the picture is tighter and the subject more clearly defined.
Again: the chosen Dynamic Point is circled. The wonderful Rule of Thirds actually removes clutter and cleans up the image.
There are some wonderful ways to achieve this most useful Rule of Thirds thingie. Many cameras have a grid built into the viewfinder.
Lightroom, designed by Adobe to work seamlessly with Photoshop, offers a REALLY useful crop tool that adjusts the crop for the Rule of Thirds as you change the crop.
There are a few plug-ins you might want to consider that work from within Photoshop. Among the best is Power Retouche's Golden Sections Filter.
Some pics are posted to the right.
Can you see the Rule of Thirds at work?