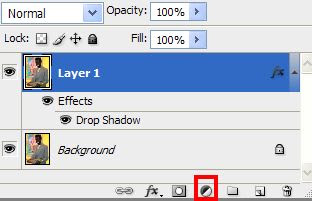
 I think this is one of the top questions: "What's an adjustment layer?" There's a second unspoken question: "Why should I care???"
Adjustment Layer is third ONLY to "Curves", the whole notion of "Layers" and my most used command ("Undo") in the pantheon of "Cool Stuff in Photoshop."
What is it?
It's a layer that you can do all kinds of adjustments (from Brightness/Contrast to Curves to Hue and Saturation) to an instantly created COPY of your original. This means that if you screw it up, you aren't totally messed up because the work you did is on a copy. I think of the Adjustment Layer as an infinately adaptable magic layer on top of my graphic...but that's probably just me.
How is this different from the idea of copying a layer and working on the copy? you ask. Gee...that's a good question. Adjustment layers are wonderful because you can SELECT areas to apply your changes to without ever touching a selection tool.
You PAINT them onto the Adjustment mask.
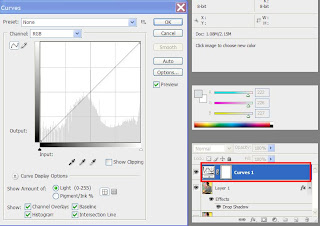
Once you've added an Adjustment Layer you'll see a NEW box opening in Layers. This is a relatively terrifying thing the first time you look at it because it looks so darn strange.
I've outlined the actual Adjustment Layer in spiffy red so you can find it. You get a different Adjustment menu (this one is a Curves Adjustment) depending on which adjustment layer application you chose.
The way-seriously-cool-thing about Adjustment Layers is that you can now feel free to totally screw up your graphic. You can try wild application and strange combinations and it doesn't matter. If you don't like the way it looks you can delete the layer and start all over.
I know what you're thinking. "How do you make changes to the picture without making a selection." Yet another good question!
You will see that the Adjustment layer is represented as WHITE. Finish up your adjustments. (Let's say that you want to vastly lighten a portion of your picutre...but not all of it. With your Adjustment Layer you can lighten the WHOLE picture until it looks really hideous -- all except the areas that you wanted to lighten.)
Take your Paint Bucket Tool and choose a BLACK from the color picker. Pour the Paint Bucket over top of your Adjustment Layer. You will see all your recent changes disappear. Why? Because BLACK COVERS THE LAYER.
Take your brush and choose the White default color from the color picker. Now brush over ONLY the areas of your photo you want to change.
Leave some time so you can make the appropriate number of "ooooo" and "ahhhh" sounds as you watch ONLY the portions you wanted to change show up on your screen.
You can make very precise changes to your graphic. No muss. No fuss. No selections.
It is true that what I've told you about here is a serious over-simpification of how to use Adjustment Layers. But remember that people write books about this stuff. My advice? Play around with all the many Adjustment Layers available. You'll see your graphics doing the most interesting things.
And if you mess something up? Relax. It's Photoshop.


