I love travel. And I love photography. I REALLY love Photoshop -- and so one of my greatest pleasures is working with pictures I have taken within Photoshop.
From an artistic perspective, using Photoshop on travel pics isn't just a question of removing red-eye and pumping up the contrast. It's about trying to capture what if FELT like to be standing there...or to take a photograph that shows a fresh "take" on what otherwise would just be a snapshot.
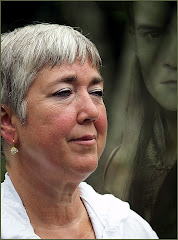
My wife and I are huge Lord of the Rings fans. Actually we were into the series long before the movies came out. So when we went to Australia and New Zealand, one of the highlights of the trip was seeing places where the Lord of the Rings movies were shot.
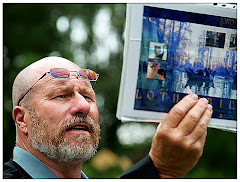
Even fans of the movies may not recognize the white bridge in the picture. It's just a white bridge. But this particular bridge was the scene of some very significant scenes in the movies.
I took a picture of the bridge -- like everyone else, dutifully standing there snappinc pictures. But how do you show what the site was actually all about? The solution? I scanned and re-worked a picture of one of the LOTR characters and hid it inside the bottom left hand part of the picture. (NOTE: Doing it this way means I am using a picture I didn't take...so it's purely a graphic for my own use. But Cate Blanchette wasn't available for a sitting...)
If you're using Photoshop, the trick to getting the picture right is the DESATURATE the picture so that you get nicely contrasted lines. I then put the picture through Virtual Painter until I got a result I liked -- and then I blended the layers together to get the result I wanted. Finally -- in putting the final graphic together, I lightened the opacity to about 50% and used the often-overlooked "Overlay" Blending option. I finished the graphic with a simple green border.
Saturday, January 26, 2008
Subscribe to:
Posts (Atom)