First I don't hear from you guys in weeks and have nearly talked myself into thinking I am talking to myself on this blog -- and then I get a bunch of emails.
Sandra from somewhere in England wants to know how she can create the "photo realistic borders" around her picture.
I really like this effect and I use it a lot. It's one of those things that adds a nice "snapshot" look to a photo.
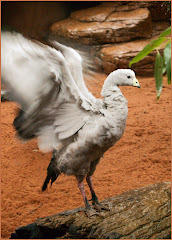
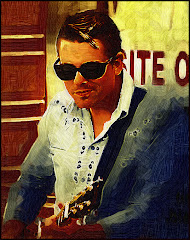
Here for example is a picture of a dog that would have happily gnawed his way through that fence to take a chunk out of me. So I took his picture. The finished pic is here. There's a black border around it and the graphic itself looks like it's lifting off the backing because of the shadow.
Here's how it was done.
 First duplicate your main photo. On the PC the command is "Control J," which brings up a carbon copy of your graphic. Click on the layer you have just created. It turns blue to show it's active. Go to the bottom of Layers . I've highlighted the little "fx" symbol. Click on it. This brings up a whole Layer Style menu.
 You want to create a "Stroke" around your graphic so click where you see I have clicked on the Layer Style menu and you will see the Stroke Menu Options listing coming up on the right hand side.
Let me draw your attention to the COLOR area. It's highlighted in blue. If you click on the square of color (it's that black block) and move your cursor around the desktop, you will see that Photoshop makes every color you can see there available as your color selection.
It's always good form to take your Stroke color from another color pre-existing in your picture. So I rested my cursor on one of the dark spots on the friendly doggie and accepted the color selection.
Now you need to decide how thick you want the stroke to be. You'll find this in the blue box marked "Structure." We want a nice thick border here. So 3 px should do it. You aren't going to see any difference unless you change the Position Option to INSIDE.

Here you have a nice black border around your picture. Almost done. Just a little flash left. Click on the Drop Shadow selection. I like the settings in this "Layer Style" screenshot.
If you're following along with me on this tutorial, you don't see anything, right? That's because we have added a Drop Shadow to an area that is BIGGER than the graphic.
So there's one more step.
 You need to increase the size of you CANVAS. The word CANVAS is in big letters because you don't want to increase the size of you "Image." So go to Image> CANVAS Size and you will get this menu.
Try increasing the NEW SIZE settings by about .25 inches. This is pretty simple math, even for me.
A wee note here: if you wanted to add to the bottom of your graphic, for a title or a date etc. you could change the anchor position, which is a very cool option when you want it.
Also you can pick the color of the extension you are choosing by clicking in the color block to the right of Canvas extension color. This is a very spiffy thing if you are going to increase the top portion of a stock photo so you have a writing area. You can match precisely the same colors on your graphic by running your cursor over the picture.
You may feel free to let loose with a hearty "Tuh-DUM" when you're done.