 There are some things that video just does better than still photography. I started figuring that out around the midnight hour on Fremont Street in Las Vegas.
That's when they turn on all the vintage signs and since both my wife and myself LOVE these signs, we were looking forward to photographing them.
You are not going to get a better exposure or a tighter crop than the picture on the left. It was an amazing sign. The colors came on in impressive waves and, by prefocussing and judging the time exactly, I was able to hit the shutter button when all the lights were on.
It's still not a very interesting picture, is it?
Neon and flashing lights are about...well...neon and flashing. You can't convey that in a photo. You can just capture that one second and hope that is able to give your viewer a taste of what it was like to be there.

Even when the sign itself is interesting, like "Smoking Good Times" you still won't get a great image. It's like taking a picture of a picture, or someone else's artwork to me.
If we are taking pictures as graphic artists, we need to take pictures that show our subject in a new light, and hopefully convey a sense of that subject. Otherwise it's a picture of a picture, neon or not.

I am told that the name of this neon girl is "Vegas Vicki." She is currently working over a "Gentlemen's Club" in Fremont Street.
As I stood there late in the night, I had a sneaking suspicion that my neon sign graphics weren't going to be all that interesting. So I started taking pictures at odd angles, with strange close-ups.
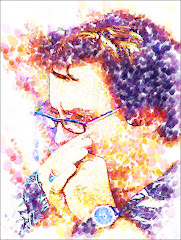
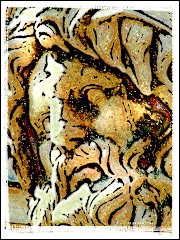
I wanted to take the neon out of this picture so FIRST I copied the original layer and blured it a little. I wanted to take the harshness of the flat neon lines out. Then I added a blur around the outside of the graphic, since I wanted only her face to be featured.
I copied the original again onto it's own layer and worked adding a brush-stroke texture my graphic. Reducing the Opacity on this layer to about 40% allowed me to have a whisper of that texture come through to make the picture have a "painterly" effect.
Finally -- I flattened the layers and took the whole mess to Virtual Painter's Watercolor filter. I use this plug in all the time and it did a great job on de-neoning the whole graphic.
There's another multi-layered "saloon type neon girl" a little further down Freemont. I looked at this sign for several minutes before I started shooting.
I was trying to see it in a different light. 

"What else could she be?" I asked myself.
"She's a superhero," I answered me -- surprising myself with the observation as well as drawing some odd looks from passersby.
So I shot her that way. When I was done, her hand is in the air and she looks like Wonder Woman about to kick someone's butt.
I worked with a Contrast Adjustment Layer to bring the colors down to five or six primary colors. I added a halftoned look and finally took the whole graphic to Alien Skin's Snap Art Comic Book filter. I added a brick wall texture very gently behind the main figure and am very pleased with the final result.
Here are 5 Kick-Butt Tips for Shooting Neon Signs at Night:
1) Brace Your Camera: A tripod is a great idea. But, since I am pretty lazy about what I carry, I have also found fence posts, light standards, garbage cans etc. wonderful places to put my camera down to avoid the dreaded "night shake" syndrome.
2) Use Your Delayed Shutter: This is the setting you use when YOU want to be in the picture. Usually it's a three to ten second delay after you press the shutter button. This allows you to avoid camera shake since the camera is no-doubt-about-it still and stays still after the shutter's pushed.
3) Make Sure You Consider Your Scene Modes or a High ISO: A common problem with night is the...ummm...darkness. So you need to give your camera every break. I'd much rather get an exposure that is a little dark because I can tease the detail out using Photoshop. If the exposure is too light -- that detail's not there.
4) Take LOTS of Pictures From Odd Angles: You never know how you are going to be using the shots. But if you take LOTS of shots you have a very good chance of seeing one you can use for whatever strange and wonderful treatment you have in mind.
5) Study your Subject BEFORE You Start Shooting: What else could it be? Is there one part of the image that would make a great close-up? Could the picture be of something other than what it is? Could a soldier be a superhero? Could a sunset be an atomic explosion?'


No comments:
Post a Comment